
ผ่านมาสองตอนเรียบร้อยกับเรื่องของ ESP8266/ESP32 ในการเอามาทำ Mesh Network ซึ่งยาวมากๆ ถ้าใครทำตามผ่านมาได้ถึงตอนนี้ไม่มีอะไรยากละครับ ตอนนี้จะเป็นเรื่องของการเชื่อมต่อหรือ Bridge เจ้า Local Mesh Network ของเราเพื่อออกไปสู่ Internet กันครับ ซึ่งในที่นี้เราก็จะเพิ่ม Bridge Node ของเราเข้าไป เพื่อต่อเข้ากับ Server Node แต่ก่อนอื่น เรามาดูเรื่องการส่งข้อมูลผ่าน Serial Port ของ Nodemcu สองตัวกันครับ เพราะสามารถประยุกต์ใช้งานอย่างอื่นได้อีก
ตัวอย่างเพื่อประยุกต์ใช้ในการส่งผานข้อมูลของ Nodemcu สองตัวผ่าน Serial Port
Redundant (Active-Standby): อย่างที่ทราบกันดีว่าพลังในการประมวลผลและหน่วยความจำของ ESP8266 นั้นมีจำกัด ซึ่งเราก็สามารถที่จะให้ Nodemcu ของเราทำงานสลับกันได้ กรณีตัวใดตัวหนึ่งตายไป อีกตัวก็ขึ้นมาทำงานแทนแล้วก็ส่งสัญญาณไป reset Nodemcu ตัวที่ตายไป พอโดนปลุกขึ้นมาใหม่ก็มาอยู่ใน Standby Mode คอยฟังสัญญาณผ่านทาง Serial Port ซะ ซึ่งเราสามารถทำ Heart Beat Check ผ่านทาง Serial Port ได้ โดยที่ Nodemcu สามารถทำงานแทนกันไปแทนกันมาได้ตลอด เพราะอย่างที่ทราบกันดีอุปกรณ์ดีขนาดไหนก็มีโอกาสทีจะ hang ได้ ถ้า reboot แล้วกลับมาทำงานตามปกติก็ดี แต่ถ้าไม่ปกติก็อาจทำให้งานที่ทำอยู่เสียหายได้ ถ้าเป็นสถานที่ที่ต้องเดินทางก็คงลำบากอีก บางคนอาจจะคิดว่าอ้าววว ถ้างั้นก็ให้มันทำงานสองตัวตั้งแต่แรกก็ได้สิ ทำงานพร้อมๆกันเลย อันนี้อาจต้องมองแล้วแต่เคสครับ เพราะบางทีเราอาจจะไม่ได้ใช้งานเป็น Sensor Node อย่างเดียว
Communication Channel: เคสนี้จะเป็นเคสที่เราจะใช้กันในตอนที่ 3 นี้ครับ ซึ่งบางโปรเจคที่ทำกับ Arduino หรือ MCU บางตัวก่อนหน้านี้ที่ไมมี WiFi รองรับแล้ววันนึงอยากจะส่งค่าออกมาเพื่อ monitor ผ่านทาง Internet ก็สามารถทำได้โดยที่ MCU เดิมส่งค่าผ่านมาทาง Serial Port แล้วใช้ ESP8266 รับค่า จากนั้นก็ส่งข้อมูลผ่าน WiFi
น่าจะพอเห็นภาพการใช้งานเพื่อสื่อสารระหว่าง Nodemcu 2 ตัวผ่าน Serial Port กันแล้ว เรามาดูในส่วนของ Code กันบ้างซึ่งเนื่องจากข้อจำกัดของ Nodemcu ที่มี Serial Port แค่คู่เดียว และเราใช้มันในการ Flash Code ของเรารวมถึง Monitor ผ่าน Serial Monitor ใน Arduino IDE อีก แต่ว่าโชคดีที่ ESP8266 นั้นสามารถใช้งาน Software Serial เพื่อใช้ i/o ที่มีอยู่ในการทำงานเป็น Serial Port แทนได้ เพื่อให้เห็นภาพเรามาเริ่มที่ตัวอย่างนี้กันครับ โดยใช้ mcu2 ตัว
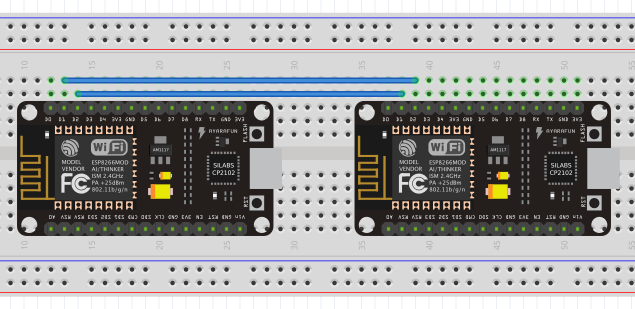
เริ่มจาก Copy Code ด้านล่างนี้แล้วก็ Flash ลง Nodemcu ทั้งสองตัวเลย ซึ่งใน Code ผมกำหนดให้ D1 เป็น RX ส่วน D2 เป็น TX ฉะนั้นการต่อสายจะเป็นลักษณะไขว้กันระหว่าง RX<->TX ตามรูปด้านบน
#include <SoftwareSerial.h>

SoftwareSerial swSerial(D1, D2, false, 128); //Define hardware connections RX, TX

int i = 0;
String DataString;

void setup() {

  pinMode(D1, INPUT);
  pinMode(D2, OUTPUT);

  Serial.begin(115200);   //Initialize hardware serial with baudrate of 115200
  swSerial.begin(115200);    //Initialize software serial with baudrate of 115200

  Serial.println("\nSoftware serial test started");

}

void loop() {

  swSerial.print("Hello: " + String(i));
  i++;

  while (swSerial.available() > 0)
  {
    char c = swSerial.read();  //gets one byte from serial buffer
    DataString += c; //makes the string DataString

  }

  if (DataString  != "")
    {
      Serial.println(DataString);
    }


  DataString = "";
  delay(1000);


}
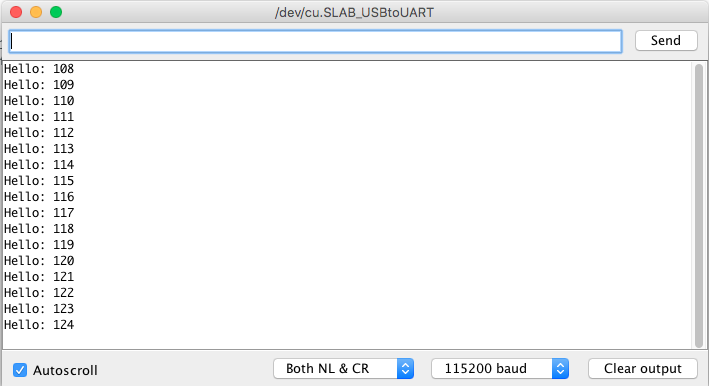
เมื่อเปิด Serial Monitor มาดูก็จะเห็นว่าค่าที่ print ออกมาผ่านทาง Serial Port(HW Serial) นั้นคือค่าที่เราอ่านได้จาก swSerial (Software Serial) ซึ่งวนลูปเพิ่มค่า i ไปเรื่อยๆ โดยเป็นค่าที่รับมาจาก Nodemcu อีกตัวหนึ่ง ค่าที่ได้รับมานี้ก็ขึ้นอยู่กับเราว่าจะเอาไปทำอะไรต่อ
มาต่อกันที่เคสของตอนนี้ของเรากันดีกว่า นั่นก็คือการ Bridge ระหว่าง Local Mesh Network ของเราเพื่อส่งข้อมูลออกไปยังโลกภายนอกกัน โดยที่ Scenario ที่เราจะจำลองขึ้นมาจะใช้ Nodemcu ทั้งหมด 5 ตัวดังรูปด้านล่างนี้
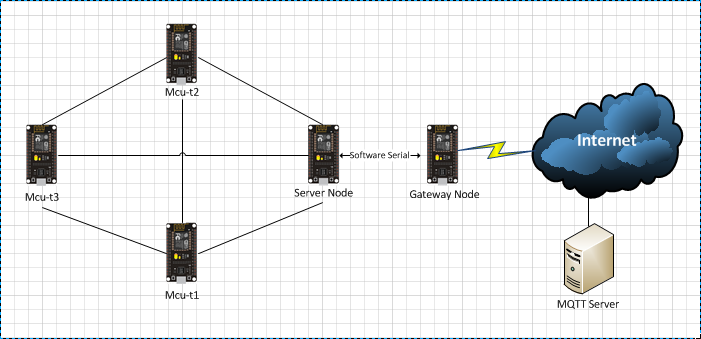
- mcu-t1 ถึง mcu-t3 เป็น Mesh Node ที่ส่งค่า Temp/Humidity ไปที่ Server Node
- Server Node ที่รับค่าจาก Node อื่นๆมา จะส่งค่าไปที่ Gateway Node ซึ่งทำการ Bridge ข้อมูลระหว่าง Mesh Network กับ WiFi Network แล้วส่งค่าออกผ่านทาง internet
- Gateway Node ที่รับข้อมูลจาก Server Node ผ่านทาง software serial จะส่งค่าไปที่ MQTT Server
*MQTT คืออะไร โดยละเอียดไว้ติดตามกันต่อตอนที่ 5 แต่คร่าวๆคือ messaging protocol ตัวหนึ่งซึ่งใช้รับส่งข้อความผ่าน IP Network อารมณ์คล้ายๆ Instant Message ซึ่งการรับส่งข้อความ จะใช้ลักษณะของการ Public(ส่ง)-Subscribe(รับ) กับ Topic ที่เราต้องการ ซึ่ง MQTT จะใช้มากในงานของ iot เพราะไม่ซับซ้อน กิน resource น้อยและค่อนข้าง realtime
ในส่วนของ Code ก็ประกอบด้วย 3 ส่วนด้วยกัน Code ชุดแรกสำหรับ Nodemcu ที่ต่อกับ DHT22 เพื่อส่งค่า Temp/Humidity ผ่านทาง Mesh Network ไปให้ Server
Code ชุดที่หนึ่ง สำหรับ mcu-t1 ถึง mcu-t3 ในการอ่านค่า Temp/Humidity
#include "painlessMesh.h"
#include "DHT.h"

#define DHTPIN D4
#define DHTTYPE DHT22

#define   MESH_PREFIX     "HelloMyMesh"
#define   MESH_PASSWORD   "hellomymeshnetwork"
#define   MESH_PORT       5555

DHT dht(DHTPIN, DHTTYPE);

void receivedCallback( uint32_t from, String &msg );

painlessMesh  mesh;

size_t logServerId = 0;

// Send message to the logServer every 5 seconds
Task myLoggingTask(5000, TASK_FOREVER, []() {

  float h = dht.readHumidity();
  float t = dht.readTemperature();


  DynamicJsonBuffer jsonBuffer;
  JsonObject& msg = jsonBuffer.createObject();
  msg["nodename"] = "mcu-t3";  //change for identify for the node that send data mcu-t1 to mcu-t3
  msg["NodeID"] = mesh.getNodeId();
  msg["Temp"] = String(t)+"C";
  msg["Humidity"] = String(h)+"%";

  String str;
  msg.printTo(str);
  if (logServerId == 0) // If we don't know the logServer yet
    mesh.sendBroadcast(str);
  else
    mesh.sendSingle(logServerId, str);

  // log to serial
  msg.printTo(Serial);
  Serial.printf("\n");
});

void setup() {

  Serial.begin(115200);
  Serial.println("Begin DHT22 Mesh Network test!");

  dht.begin();

  mesh.setDebugMsgTypes( ERROR | STARTUP | CONNECTION );  // set before init() so that you can see startup messages

  mesh.init( MESH_PREFIX, MESH_PASSWORD, MESH_PORT, STA_AP, AUTH_WPA2_PSK, 6 );
  mesh.onReceive(&receivedCallback);

  // Add the task to the mesh scheduler
  mesh.scheduler.addTask(myLoggingTask);
  myLoggingTask.enable();

}

void loop() {
  // put your main code here, to run repeatedly:

  mesh.update();


}

void receivedCallback( uint32_t from, String &msg ) {
  Serial.printf("logClient: Received from %u msg=%s\n", from, msg.c_str());

  // Saving logServer
  DynamicJsonBuffer jsonBuffer;
  JsonObject& root = jsonBuffer.parseObject(msg);
  if (root.containsKey("topic")) {
      if (String("logServer").equals(root["topic"].as<String>())) {
          // check for on: true or false
          logServerId = root["nodeId"];
          Serial.printf("logServer detected!!!\n");
      }
      Serial.printf("Handled from %u msg=%s\n", from, msg.c_str());
  }
}
Code ชุดที่สองสำหรับ Nodemcu ที่ทำหน้าที่เป็น Server Node เพื่อรับค่า Temp/Humidity ผ่านทาง Mesh Network จากนั้นส่งต่ออีกทอดหนึ่งไปยัง Gateway Node โดยใช้การสื่อสารผ่านทาง Serial Port ซึ่งจุดที่จะเพิ่มก็คือการเรียกและกำหนดขาที่จะใช้งาน Software Serial และการส่งข้อมูลผ่านทาง Software Serial Port ใน receivedCallback
Code ที่ใช้สำหรับ Server Node
#include "painlessMesh.h"
#include <SoftwareSerial.h>

#define   MESH_PREFIX     "HelloMyMesh"
#define   MESH_PASSWORD   "hellomymeshnetwork"
#define   MESH_PORT       5555

SoftwareSerial swSerial(D1, D2, false, 128); //Define hardware connections RX, TX

painlessMesh  mesh;

// Send my ID every 10 seconds to inform others
Task logServerTask(10000, TASK_FOREVER, []() {
    DynamicJsonBuffer jsonBuffer;
    JsonObject& msg = jsonBuffer.createObject();
    msg["topic"] = "logServer";
    msg["nodeId"] = mesh.getNodeId();

    String str;
    msg.printTo(str);
    mesh.sendBroadcast(str);

    // log to serial
    msg.printTo(Serial);
    Serial.printf("\n");
});

void setup() {

  pinMode(D1, INPUT);
  pinMode(D2, OUTPUT);

  Serial.begin(115200); //Initialize hardware serial with baudrate of 115200
  swSerial.begin(115200);    //Initialize software serial with baudrate of 115200


  mesh.setDebugMsgTypes( ERROR | CONNECTION | S_TIME );

  mesh.init( MESH_PREFIX, MESH_PASSWORD, MESH_PORT, STA_AP, AUTH_WPA2_PSK, 6 );
  mesh.onReceive(&receivedCallback);

  mesh.onNewConnection([](size_t nodeId) {
    Serial.printf("New Connection %u\n", nodeId);
  });

  mesh.onDroppedConnection([](size_t nodeId) {
    Serial.printf("Dropped Connection %u\n", nodeId);
  });

  // Add the task to the mesh scheduler
  mesh.scheduler.addTask(logServerTask);
  logServerTask.enable();
}

void loop() {
  mesh.update();
}

void receivedCallback( uint32_t from, String &msg ) {
  Serial.printf("logServer: Received from %u msg=%s\n", from, msg.c_str());

  swSerial.print(msg.c_str()); // Print received data in Mesh Network to Software Serial Port

}
Code ชุดที่สามสำหรับ Nodemcu ที่ทำหน้าที่เป็น Gateway Node เพื่อรับค่า Temp/Humidity ผ่านทาง Serial Port จาก Server Node จากนั้นก็ส่งค่าที่ได้รับไปยัง MQTT Server ซึ่งในความเป็นจริงแล้วปลายทางของ Gateway ในการส่งผ่านข้อมูลไปจะเป็นอะไรก็ได้ อาจจะเป็น Webservice, Blynk, Firebase หรืออะไรก็ตามใช้หลักการเดียวกันเลย
Code ที่ใช้สำหรับ Gateway Node เพื่อส่งข้อมูลไปยัง MQTT server ซึ่งถ้าใครอยากจะทดลองในส่วนนี้ก็ติดตามจากตอนที่ 5 ในเรื่องของการตั้ง MQTT Server บน Google Cloud หรืออาจะหาใช้บริการ Cloud MQTT ซึ่งมีส่วนให้บริการฟรีก็ได้ครับ
#include <SoftwareSerial.h>
#include <ESP8266WiFi.h>
#include <PubSubClient.h>

const char* ssid = "xxx";  //wifi ssid
const char* password = "xxx"; //wifi passwd

IPAddress mqtt_server(xx, xx, xx, xx); //ip of mqtt server

WiFiClient espClient;

long lastMsg = 0;
char msg[100];
int value = 0;

String DataString;


SoftwareSerial swSerial(D1, D2, false, 256); //Define hardware connections RX, TX


void callback(char* topic, byte* payload, unsigned int length) {
  Serial.print("Message arrived [");
  Serial.print(topic);
  Serial.print("] ");
  for (int i = 0; i < length; i++) {
    Serial.print((char)payload[i]);
  }
  Serial.println();

}

PubSubClient client(mqtt_server, 1883, callback, espClient);

void setup() {

  pinMode(D1, INPUT);
  pinMode(D2, OUTPUT);

  Serial.begin(115200);   //Initialize hardware serial with baudrate of 115200
  swSerial.begin(115200);    //Initialize software serial with baudrate of 115200

  Serial.println("Bridget Node Gateway to MQTT");

  Serial.println();
  Serial.print("connecting to ");
  Serial.println(ssid);
  WiFi.begin(ssid, password);
  while (WiFi.status() != WL_CONNECTED) {
    delay(1000);
    Serial.print(".");
  }
  Serial.println("");
  Serial.println("WiFi connected");
  Serial.println("IP address: ");
  Serial.println(WiFi.localIP());

  client.connect("MeshGateway", "xxx", "xxx"); //MeshGateway is node name, change xxx to user/passs of your server
  client.setCallback(callback);
  client.subscribe("command");


}

void loop() {


  while (swSerial.available() > 0)
  {
    char c = swSerial.read();  //gets one byte from serial buffer
    DataString += c; //makes the string DataString

  }

  if (DataString  != "")
  {
    Serial.println(DataString);

    if (!client.connected()) {
      reconnect();
    }

    client.loop();

    DataString.toCharArray(msg, 100);
    client.publish("envMesh", msg);  //publish message to mqtt server with topic envMesh

  }


  DataString = "";
  delay(1000);


}

void reconnect() {
  // Loop until we're reconnected
  while (!client.connected()) {
    Serial.print("Attempting MQTT connection...");
    // Attempt to connect
    if (client.connect("MeshGateway", "xxx", "xxx")) {  //userbame of your mqtt server
      Serial.println("connected");
      // Once connected, publish an announcement...
      client.publish("outTopic", "hello world");
      // ... and resubscribe
      client.subscribe("inTopic");
    } else {
      Serial.print("failed, rc=");
      Serial.print(client.state());
      Serial.println(" try again in 5 seconds");
      // Wait 5 seconds before retrying
      delay(10000);
    }
  }
}
เมื่อเปิด Nodemcu ทั้ง 5 ตัวขึ้นมา เหตุการณ์จากตอนที่ 2 ก็จะปรากฎขึ้นดัง step ต่อไปนี้
- mcu-t1 ถึง mcu-t3 จะ join เข้า mesh network แล้วส่งค่า broadcast ไปยังทุก Node และคอยฟังว่าใน Mesh Network นี้มี Server Node มั้ย ถ้ามีก็จะทำการบันทึก Server NodeID แล้วหลังจากนั้นก็ส่งเป็นแบบระบุปลายทางไปที่ Server Node ละ
- Step นี้ที่จะเพิ่เข้ามาก็คือ ที่ Server Node เมื่อได้รับค่าที่ส่งมาภายใน Mesh Network ก็จะทำการ Forward ต่อไปยัง Gateway Node ผ่านทาง software serial port ได้อะไรมาก็ส่งไปอย่างนั้น ให้ดู code ในส่วนของ receivedCallback ที่จะทำการ print ค่าออกทาง software serial
swSerial.print(msg.c_str());
- ที่ Gateway Node เมื่อได้รับค่าที่ส่งมาจาก software serial port ก็จะทำการส่งต่อค่านี้ไปยัง mqtt server
ส่วนผลลัพท์ที่อ่านค่าได้จาก MQTT Server นั้นผมใช้โปรแกรม MQTT.fx ซึ่งเป็น Client ที่มีให้ใช้งานได้หลากหลาย platform เลยเนื่องจากว่าเป็น Java based ก็สามารถโหลดได้จากเวปของ MQTT.fx ได้เลยครับ
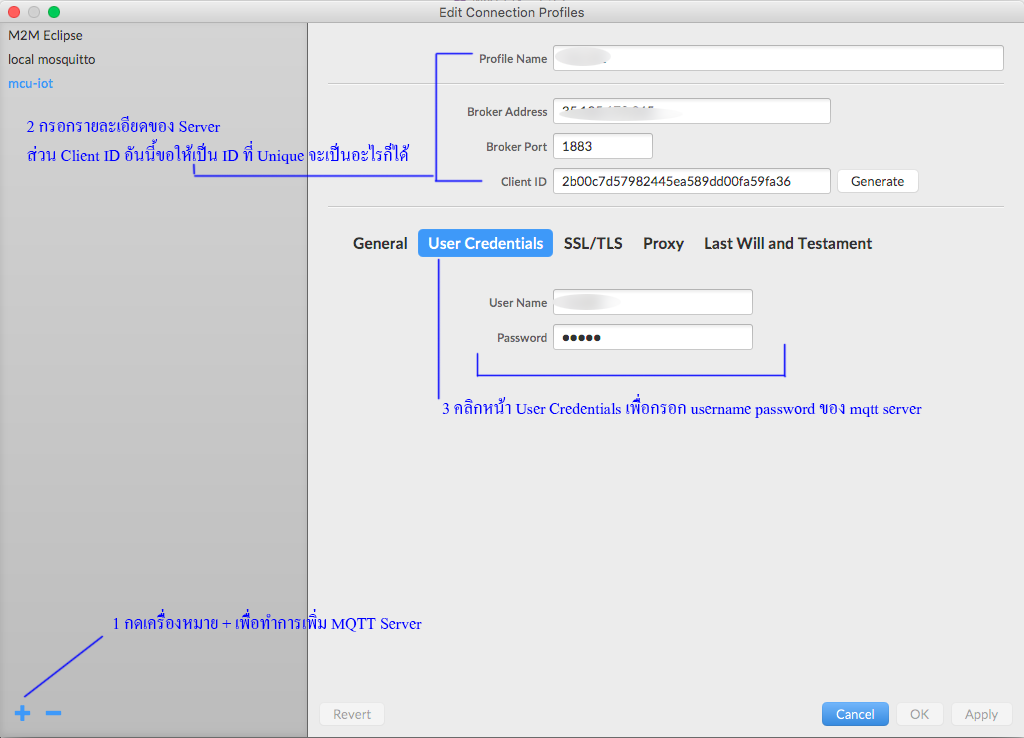
การใช้งานก็เริ่มจากการตั้งค่ากันก่อน ที่หน้าแรกให้คลิกที่รูปเฟือง เพื่อเข้าสู่หน้าจอการตั้งค่า แล้วก็ตั้งค่าตาม MQTT Server ของแต่ละท่านที่ใช้กันอยู่เลยครับ หรือจะใช้บริการฟรีของ Cloud MQTT ก็ได้

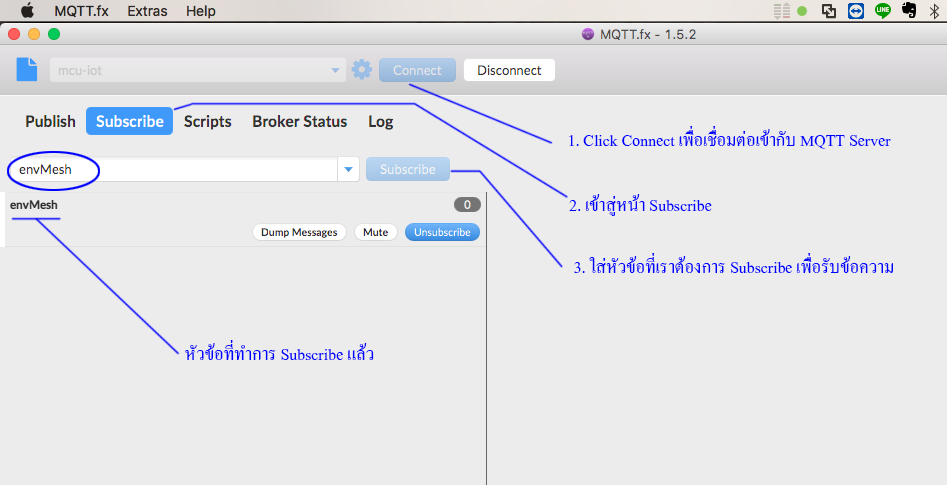
ทำการ Subscribe หัวข้อ envMesh ตาม Code ที่อยู่ใน Gateway Node
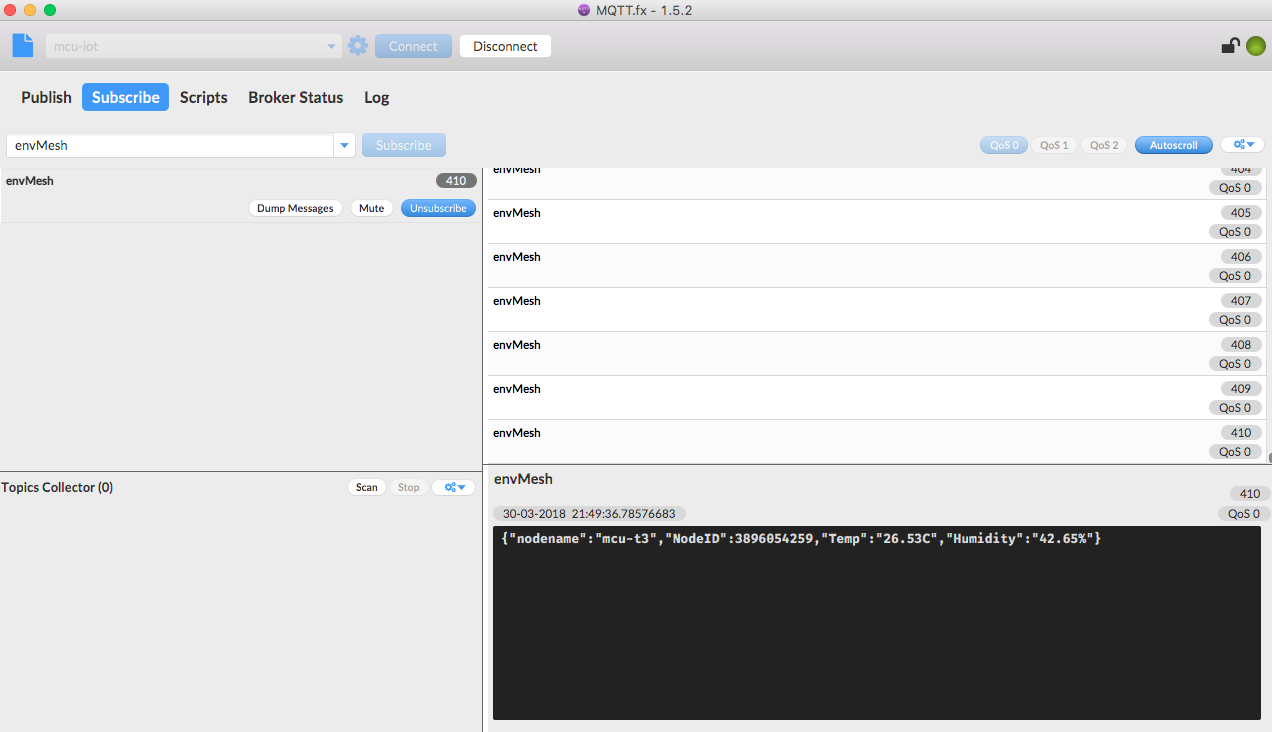
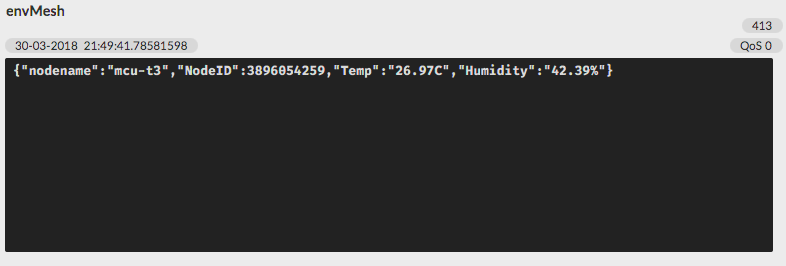
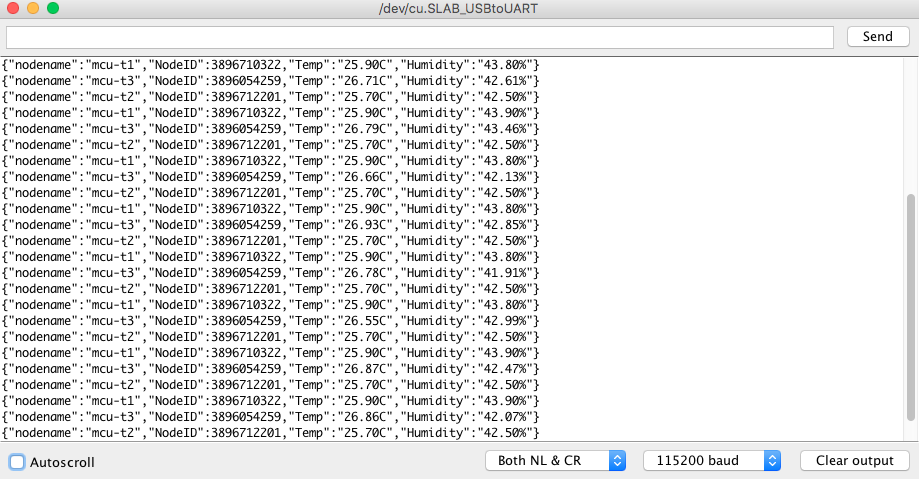
จากรูปก็จะเห็นข้อความที่อ่านได้จาก MQTT Server ก็จะเป็นรูปแบบ JSON โดยส่งมาเป็นทอดๆ จาก Local Mesh Network –> Server Node ภายใน Mesh Network –> Gateway Node ผ่านการ Bridge โดยใช้ Software Serial จากนั้นก็ส่งต่อไปที่ MQTT Sever ผ่าน WiFi/Internet –> แล้วเราก็ใช้โปรแกรม MQTT.fx เข้าไป Subscribe เพื่ออ่านค่าที่ส่งมาให้หัวข้อ envMesh
จริงๆสำหรับวันนี้ใจความหลักเลยจะเป็นเรื่องของการใช้งาน Software Serial ที่ใช้ในการสื่อสารกันระหว่าง Nodemcu 2 ตัว ส่วนเรื่อง MQTT Server นั้นก็เป็นการทิ้งปมเพื่อให้ไปค้นกันต่อ หรือจะรอถึงตอนที่ 5 ก็ได้กับการ Setup MQTT Server ขึ้นมาใช้งานเองบน Google Cloud แล้วพบกันใหม่ตอนที่ 4 ซึ่งเราจะ Bridge ข้อมูลจาก Local Mesh Network ของเราผ่าน LORA Network กันครับ
เรื่องเล่าท้ายตอน
หลังจากห่างหายการใช้งาน mcs51 มาตั้งแต่เรียนจบปี 42 นี่ก็เกือบๆยี่สิบปีละ เพิ่งมาสองสามปีหลังที่เริ่มกลับมาค้นหาข้อมูลเกี่ยวกับพวก microcontroller ใหม่ ก็รวมไปถึงโครงการของ Raspberry Pi และ Arduino ด้วย ซึ่งถ้าอ่านจากบอร์ดเมืองนอกจะเห็นคำถามบ่อยมากว่า จะใช้อะไรดีระหว่างสองตัวนี้ ซึ่งจริงๆแล้ว Aduino เป็น Microcontroller แต่ Raspberry Pi เป็น Computer ขนาดเล็ก โดยคำถามก็เป็นเหมือนคำถามโลกแตก แต่มีคำตอบนึงที่ตอบไว้ค่อนข้างดี
“ถ้าคุณสามารถอธิบายสิ่งที่คุณต้องการจะทำให้ได้โดยใช้คำว่า and/และ ไม่เกิน 2 ตัว ใช้ Arduino แต่ถ้ามากกว่านั้นไป Raspberry Pi”
ถามว่าถูกต้องทั้งหมดมั้ย ก็ไม่ซะทีเดียว แต่ก็พอเป็นแนวทางให้ยึดได้ว่า อย่าไปใช้งาน Arduino มันหนักนัก เพราะพลังในการประมวลผลรวมถึงหน่วยความจำมันมีจำกัด แต่ถ้าเป็นงานไม่ซับซ้อน วนลูปทำไปเรื่อยๆ แน่นอนว่า Arduino นั้นตอบโจทย์ได้ดีทีเดียว
ตัว micro controller ส่งไปยัง microcomputer
ส่วนใหญจะใช้ rpi
ของผมที่ออกแบบไว้ จะใช้ andriod tablet ขนาด 7 นิ้ว ราคา 900 บาท
ตัว Server Node จะส่งข้อมูลผ่านมาทาง wifi ที่เป็๋ฯ gateway แล้ว ยิงข้อมูล เข้า cloud อีกที